
HOW TO INSTALL MIKROTIK ON THE VIRTUALBOX
VirtualBox
is a virtualization program that we can install the "additional"
operating system on the host machine. Virtualbox (virtual machine) can be used
to operate multiple OS such as Linux Ubuntu, Windows etc. VirtualBox is very
useful for simulation and testing eg when you want to do the concept of
installing an internet network somewhere, and the most helpful are when we want
to learn an OS like Mikrotik we can use it even though in reality we do not
have the tool. With VirtualBox, we can test without any real hardware device
(real device). VirtualBox itself is not paid for free (GNU License) and the
program is developed by "Oracle Corporation", the official website
you can see here.
That's a little review of
VirtualBox, and this time NH Tutorials will share Tips & Tricks how to
install MikroTik on the virtual machine (Virtual Machine) for application /
virtual program that will be used later is VirtualBox.
Before starting to install Mikrotik in virtual box that is
needed are ISO Mikrotik and VirtualBox application.
• ISO Mikrotik -> If friends do not have ISO Mikrotik please can
download here. And make a sure download with ISO type.
• Virtualbox -> If friends do not have VirtualBox application can
download on its official website. Once downloaded please install. For the
installation is quite easy may not need to explain.
INSTALL MIKROTIK ON VIRTUALBOX
1. Open the virtual box. In
suggesting right-click and run-administrator.
2. Click the "new" fill
in the name as you wish. Here NH Tutorials gives the name "Mikrotik"
for its installation. Make sure the Selected and Type "Other" options and Options. Click
next.

3. Set the ram as you wish.
Actually, for the small use, miktotik ram is also not a problem.

4. Select the second option.
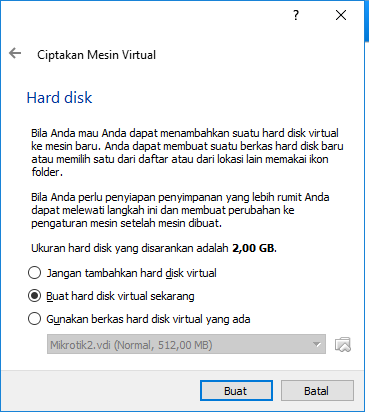
5. Select VDI (VirtualBox Disk
Image).

6. Select a fixed size.

7. Set how big you want to use
harddisk for Mikrotik installation.

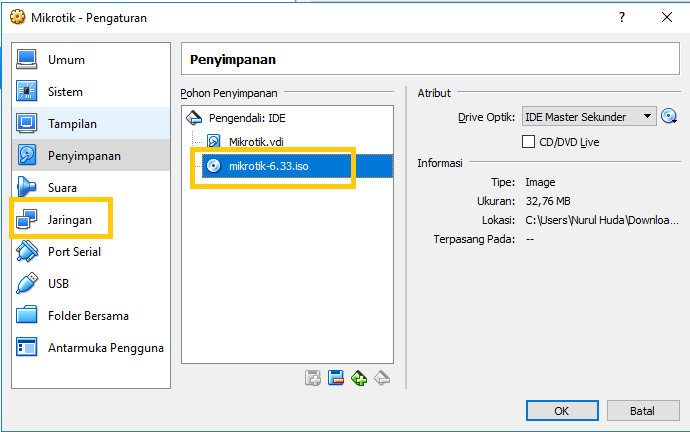
8. Select settings.

9. Input Mikrotik ISO by going to
storage menu select CD Drive logo image. In the optical drive, option click the
segment button down with the CD Drive image. After that, you will be brought to
the file manager and look for ISO Mikrotik. Click ok also have met.

10. If the Mikrotik ISO file is
already inputted now go to network menu. On adapter 1 check the network adapter
fungskikan. Select the bridge adapter and make sure the name column matches the
name of the adapter on your PC.

11. Next set the adapter 2. Check
enable network adapter. Select host-only adapter. In the Name field select the
virtual box host-only adapter. If it click ok

12. Run Mikrotik virtual box. In
the installation phase, mikrotik in virtual box is quite easy. Press keys on
keyboard "a", "i",
"n", "y" in sequence process. And wait for the process
to finish.


13. When finished as shown below.
Right-click on the CD Drive image and select remove disk drive.

14. If a dialog box appears like
this select force.

15. Ok until here the process of
installing Mikrotik in the virtual box is complete.
16. For the next step can be in
settings using winbox. Prior to his or her first IP on two interfaces Mikrotik.
IP settings can be seen in the picture below. For free IP does not have as in
the picture below.

17. When you are done set to go to
the settings menu adapter on your PC. Select on the virtual host adapter box
and set its IP according to IP ether 2 Mikrotik. Click ok when you're done. To
make sure can also by way of pinging to IP gateway ether 2. If replay brati
Mikrotik VirtualBox already connected with your PC.

18. Access VirtualBox using winbox.
IP Mikrotik ether 2 input. Username and password are still the default that is
for username "admin" and for the empty password do not have to fill.


Cover
Okey Mikrotik installation in
VirtualBox is finished and can be accessed using winbox. For other arrangements
can be set according to the wishes and needs. Happy learning. If you find any
difficulties please feel free to ask in the comments field. Hopefully, this
article about how to install Mikrotik in winbox can be useful. Thank you for
visiting, reading and understanding. 😊
 Certification Dan Pembahasan Lengkap.")


